Spotify lets you enjoy music across multiple devices, but sometimes, you might want to remove an old or unauthorized device from your account. Perhaps you are switching to a new phone and want to clear out the old one, or maybe you have shared your account with someone else temporarily and want it back. In other cases, you might find unfamiliar devices connected to your account, raising security concerns. Whatever the reason, it's essential to know how to remove devices from Spotify.
This article has got you covered with 3 easy methods with step-by-step instructions to help you remove unwanted devices from Spotify, giving you more control over your account and keeping it clean and safe. Also, you will discover a versatile tool for downloading Spotify songs for uninterrupted offline streaming without the hassle of device limits.
Method 1. Remove Devices from Spotify by Logging Out Account
One of the easiest ways to remove a device from Spotify is to log out of your account. Once you log out of a specific device, it will lose access to your Spotify account unless you sign back in. This method is best suited for those who still have access to the device and want to remove it manually. Whether you are upgrading your device or just want to make sure your account stays private, here's how to do it on your computer and phone.
On Computer
Step 1. Open Spotify on your Windows or Mac.
Step 2. Tap your profile icon in the top right corner.
Step 3. Select "Log out" from the drop-down menu.

On Phone
Step 1. Open the Spotify app on your Android or iPhone.
Step 2. Tap your profile icon in the top left corner, then select "Settings and privacy".
Step 3. Scroll down to the bottom and click "Log out".

By following these steps, you can easily delete the device from your Spotify account.
Method 2. Remove Devices from Spotify by Forgetting Device
If logging out doesn't completely remove a device, you can also make Spotify forget it altogether. This method is particularly useful for devices that you no longer own, such as a lost phone or a shared computer. Forgetting a device will permanently disconnect it from your account and prevent it from accessing your Spotify music. Follow the steps below to remove devices from Spotify by ditching them from your computer and phone.
On Computer
Step 1. Sign in to your Spotify account on your computer.
Step 2. Click the "Connect to a device" icon in the bottom right corner to see all the devices currently logged in to this account.
Step 3. Decide on the one to remove and hit the three dots.
Step 4. Click "Log out of this device" to remove the device from your Spotify.

On Phone
Step 1. Open the Spotify app on your phone.
Step 2. Tap the "Connect to a device" icon in the playback bar.
Step 3. Carefully choose the device you want to remove and click the three dots.
Step 4. Tap "Log out of this device" to disconnect it from your Spotify account forever.

Method 3. Remove Devices from Spotify with 'Sign Out Everywhere'
For a quick, one-time solution, you can log out Spotify on all devices at once with the "Sign out everywhere" feature. It works like a charm if you want to start fresh. It is also the best option if you suspect unauthorized access and want to revoke access from someone you once shared your login with. Here's how to remove devices from Spotify with "Sign out everywhere".
Step 1. Log in to your Spotify account on your browser or desktop app.
Step 2. Hit your profile image in the upper right corner and select "Account".
Step 3. In the new tab, scroll down to find the "Security and privacy" section and select "Sign out everywhere".
Step 4. Click "Sign out everywhere" again to confirm and start the process.

Bonus Tip: Listen to Spotify Music Without Device Limit
While removing devices from Spotify helps you manage access, Spotify restricts streaming to a certain number of devices at a time - up to 5 devices. So, if you want to play Spotify on multiple devices without limitations, downloading your music for offline playback is a great alternative.
With TuneFab Spotify Music Converter, a professional and reliable music downloader, you can save your favorite Spotify music in MP3, M4A, FLAC, and other formats and listen to it on any device without having to subscribe to Spotify Premium. It also helps you enjoy your lossless playlists, bypassing the device limits and without worrying about unexpected sign-out issues.
Features of TuneFab Spotify Music Converter:
- Compatible with both Spotify Premium and free users.
- Support downloading songs, playlists, albums, podcasts, etc. from Spotify.
- Save Spotify music to MP3, M4A, WAV, FLAC, AIFF, AAC, and ALAC formats.
- Retain 100% lossless audio quality of Spotify tracks.
- Convert Spotify music in batch at 35X faster speed.
- Fully preserve all ID3 tags and metadata info for better management.
- Easy to use with a built-in Spotify web player.
Follow the brief guide to download your favorite Spotify tracks with TuneFab Spotify Music Converter.
Step 1. Click the download button here to download and install TuneFab Spotify Music Converter on your PC. Log in to your Spotify account.
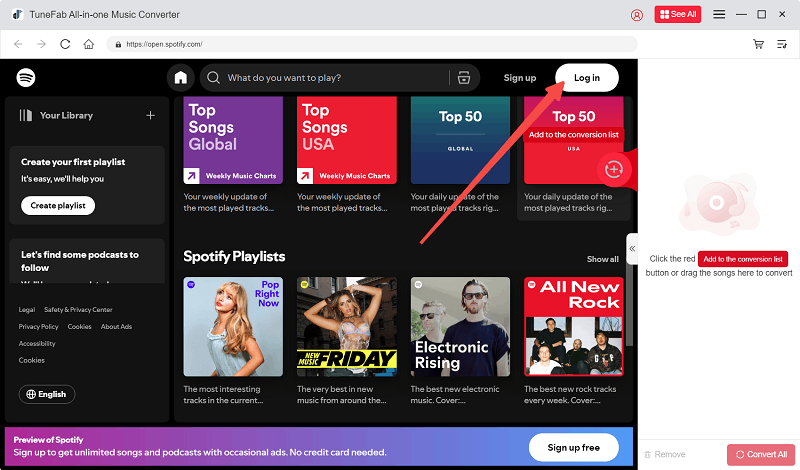
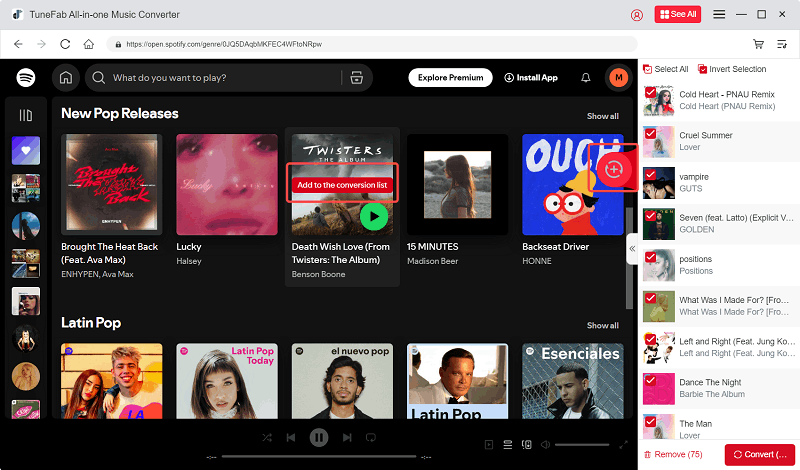
Step 2. Browse and search for the songs you want to download in the built-in Spotify web player and click "Add to the conversion list". You can also drop the music onto the red "+" icon.
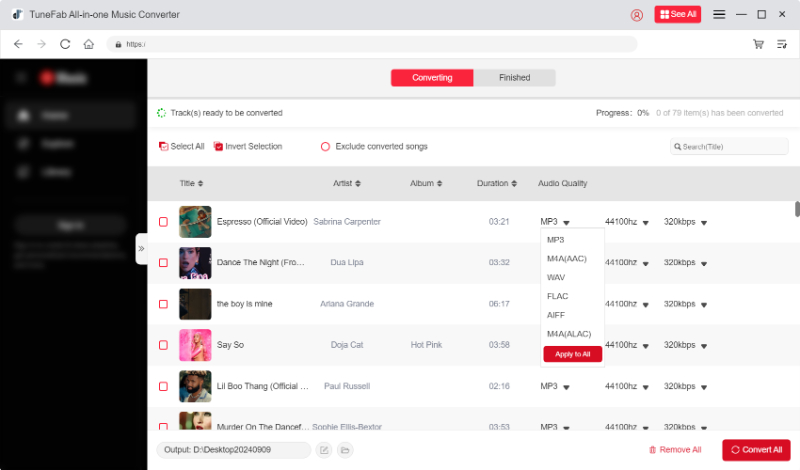
Step 3. In the conversion list, select the output format and audio quality for each song. Or tap "Apply to All" to simplify the process.
Step 4. Click "Convert All" in the bottom right corner of this page. All the songs will be downloaded to your computer in split seconds.
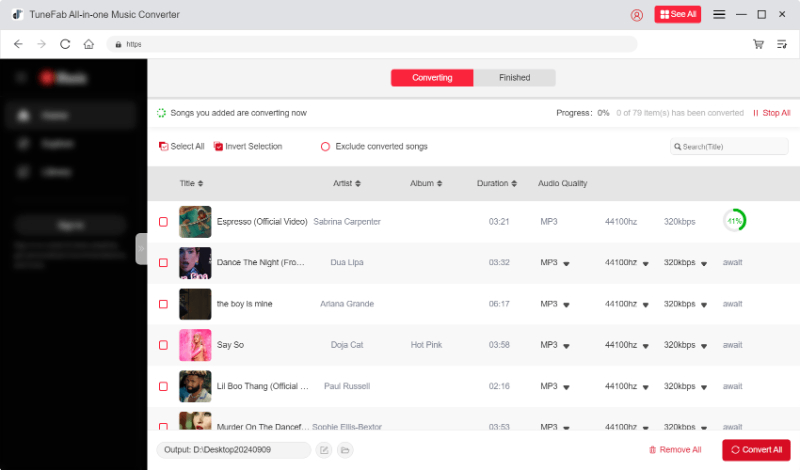
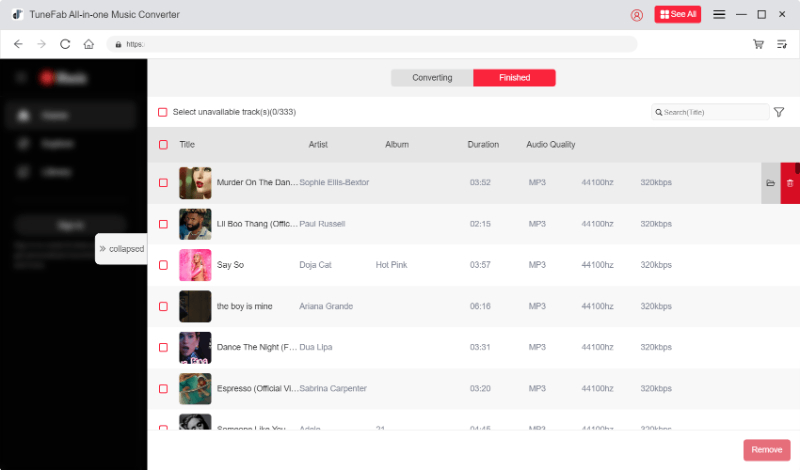
Step 5. To find the local files, navigate to "Finished" > the file icon to view the output on your computer.
FAQs About Removing Device from Spotify
Here are two questions you might encounter and how to fix them.
How to Log Out of Spotify Partner Devices?
With the "Sign out everywhere" feature, you can instantly sign out of all devices except for partner devices such as speakers, smart TVs, and game consoles which you can disconnect by signing in to your Spotify account on your desktop app or browser, tapping on your profile icon, and navigating to "Account" > "Security and privacy" > "Manage Apps" > "Remove Access".
What to Do If Spotify Sign Out Everywhere Not Working?
It is a common issue to see devices connected after using "Sign out everywhere". It can take a few minutes for the logout process to take effect, so refreshing your account page would help. If the problem persists, a surefire way to force all devices to sign out is to reset your password. Clearing your browser cache or manually disconnecting devices through Spotify Connect may also help resolve the problem.
Conclusion
Knowing how to remove devices from Spotify will keep you in control of your Spotify account and keep it safe and clutter-free. Removing devices from Spotify is easy with the right steps. Whether you log out manually or forget a device, you can keep your account secure and organized. If you want to enjoy Spotify without device limits, consider using TuneFab Spotify Music Converter to download your music and play it anytime, anywhere, even without internet access.


