


If you have a large number of WAV files on your Mac that are eating up your computer's memory, don't worry. Converting them to MP3 is one of the best solutions. In this article, we will introduce three effective methods for converting WAV to MP3 on Mac, including using pre-installed software, an open-source tool, and an online platform. What's more, we also bring you a tip to convert your favorite songs to MP3 from popular music streaming platforms. If you want to learn the detailed steps, keep reading!
You May Also Like:
How to Download Spotify Music to MP3
How to Convert Apple Music to MP3
Before You Start: WAV vs. MP3
WAV stands for Waveform Audio File Format. It is a lossless audio file format commonly used for storing high-quality audio data, making it suitable for professional audio processing and editing. However, this format results in large file sizes, taking up more storage space.
In contrast, MP3 is a widely supported audio format extensively used for music playback and online streaming. MP3 files are generally smaller, making them easier to store and share. However, as a lossy compression format, MP3 reduces the original audio quality to some extent, especially at low bitrates, where noticeable audio quality loss can occur.
Way 1. Convert WAV to MP3 on Mac using iTunes/Music App
Converting WAV to MP3 on Mac using the pre-installed software is the most convenient solution. Considering that Macs run on both newer and older systems, we have provided steps for two different software options. You can choose the one that fits your needs.
Using iTunes
Before 2019, iTunes was the default music management tool on all Mac computers. Besides playing and managing music and videos, it also has a built-in audio format conversion function. So, you can directly use this tool to convert WAV to MP3. iTunes meets basic conversion needs, supports batch conversion, and is fairly straightforward to use. However, this pre-installed tool lacks more advanced audio editing features.
Here are the specific steps:
STEP 1. Launch iTunes on your Mac and navigate to the "Preferences" option in the iTunes menu.
STEP 2. Then, click the "Import Settings" button within the "General" tab.
STEP 3. From the "Import Using" dropdown menu, choose "MP3 Encoder".

STEP 4. Click "OK" and close the preferences window.
STEP 5. In your iTunes library, select the WAV files you wish to convert.
STEP 6. Finally, hit the "File" button from the menu bar and select Convert > Create MP3 Version.
Using Apple Music
If your Mac is running macOS Catalina or later, you'll find that iTunes has been killed and replaced by Apple Music. However, there's no need to worry. As the successor to iTunes, Apple Music also allows you to convert WAV files to MP3. The steps are quite similar to those in iTunes.
Here are the detailed steps to convert formats using Apple Music:
STEP 1. Open the "Music" app on your Mac, then select "Music" > "Preferences".
STEP 2. Click on the "Files" tab, then click "Import Settings".
STEP 3. In the "Import Using" dropdown menu, select "MP3 Encoder" and click "OK".
STEP 4. In your library, select the WAV songs you want to convert. Then, select File >Convert >Create MP3 Version. The new song files will appear next to the original files in your library.

Way 2. Convert WAV to MP3 on Mac through VLC
VLC, a well-known free and open-source software, is not just a powerful media player but also offers basic conversion capabilities. Therefore, you can use it to convert audio and video files, including WAV to MP3. However, VLC does not support batch conversion, so if you have many WAV files to convert at once, this method might take a considerable amount of time.
Here are the specific steps to convert WAV to MP3 using VLC:
STEP 1. Open VLC on your Mac.
STEP 2. From the top menu bar, select "File" and then click on "Convert/Stream".
STEP 3. In the pop-up window, click "Open Media" and choose the WAV file you want to convert. From the "Choose Profile" dropdown menu, select "Audio - MP3".

STEP 4. Click on "Save as File" and "Browse" to choose the location and name for the converted file.
STEP 5. Click the "Start" button, and VLC will begin to convert the selected WAV file to MP3 format.
Way 3. Convert WAV to MP3 on Mac via Free Online Converter
In addition to desktop software, there are also online tools available for file conversion. CloudConvert.com is a powerful and user-friendly online conversion tool that supports various file formats, including WAV to MP3. As long as you have an internet connection, you can use it on any device, making it ideal for users who prefer not to download software. This platform isn't limited to audio formats; it also supports the conversion of documents, images, videos, and over 200 other file formats. In addition to uploading local files for conversion, CloudConvert.com allows you to select files from cloud storage services like Google Drive and Dropbox, or directly paste the URL of the file.
Here are the specific steps to convert WAV to MP3 using CloudConvert:
STEP 1. Open your web browser and visit the CloudConvert website.

STEP 2. Click on the "Select File" button on the page to choose the WAV file you want to convert from your computer.
STEP 3. After uploading the file, choose "MP3" as the output format from the "Convert to..." options.
STEP 4. Finally, click the "Start" button, and CloudConvert will begin converting the file.
Bonus: How to Convert ANY Music to MP3 on Mac
Using the three methods described above, you can convert your local WAV files to MP3. While some software supports advanced options like bitrate adjustment, the conversion will always result in some loss of audio quality, and the audio quality of the converted file depends on the quality of your original WAV file. Therefore, in this section, we introduce a professional tool that can directly convert music from various platforms to MP3 format, then you don't have to worry about the audio quality loss that typically occurs during WAV to MP3 conversion.
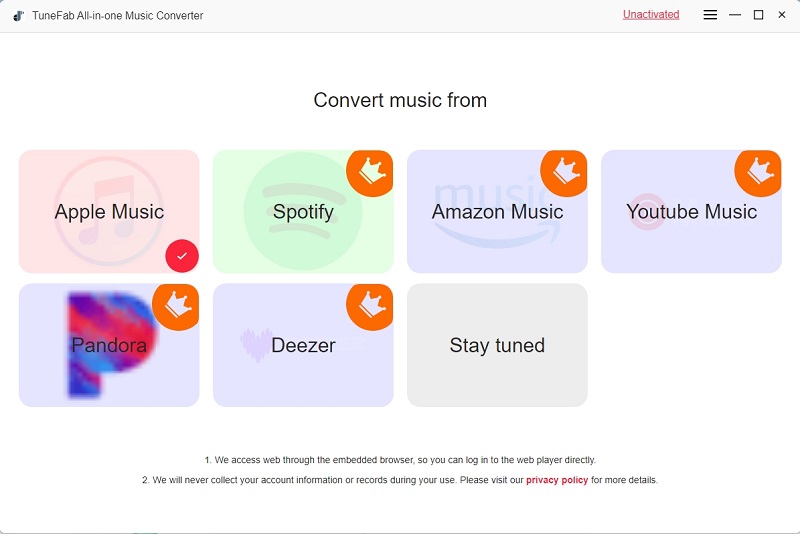
TuneFab All-in-One Music Converter is a cutting-edge streaming music converter, which includes multiple popular music platforms such as Spotify Music, Apple Music, Amazon Prime Music, Deezer Music, Pandora Music, and YouTube Music. It allows you to directly convert your favourite tracks from these platforms to MP3 format in lossless quality within one app. It also offers customizable bitrate and sample rate settings to meet your various needs. Aside from MP3, TuneFab All-in-One Music Converter is also one of the best WAV converters.
Highlighted Features of TuneFab All-in-One Music Converter:
- Batch convert audio to MP3 at 35X faster speed.
- Convert streaming music to WAV/MP3/M4A/FLAC effortlessly.
- Retain original audio quality, reaching 320kbps and 48 kHz or even lossless.
- Preserve audio ID3 tag information, including artist name, album cover, album name, etc.
Let's see how to convert music to MP3 on Mac with TuneFab All-in-One Music Converter.
STEP 1. Download and install TuneFab All-in-One Music Converter on your Mac.
STEP 2. Launch the software and choose a music streaming platform.
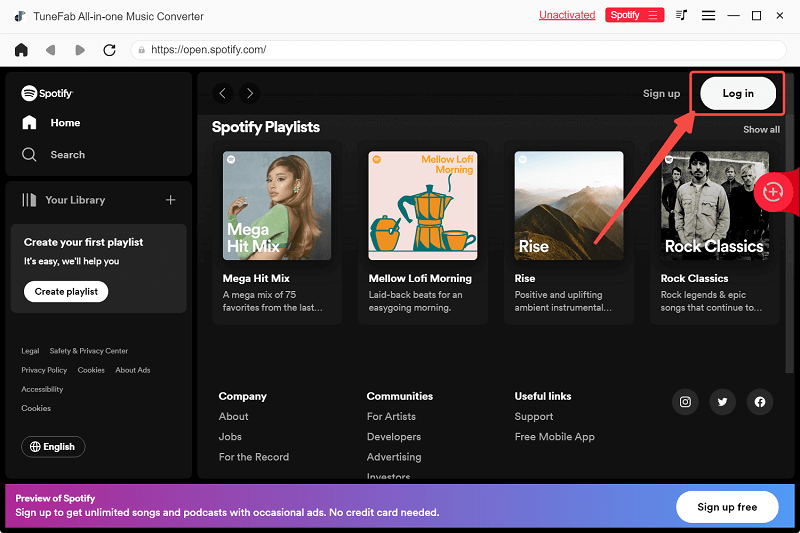
STEP 3. In the web player, click on the "Log in" button at the top right corner to log into your corresponding platform account.
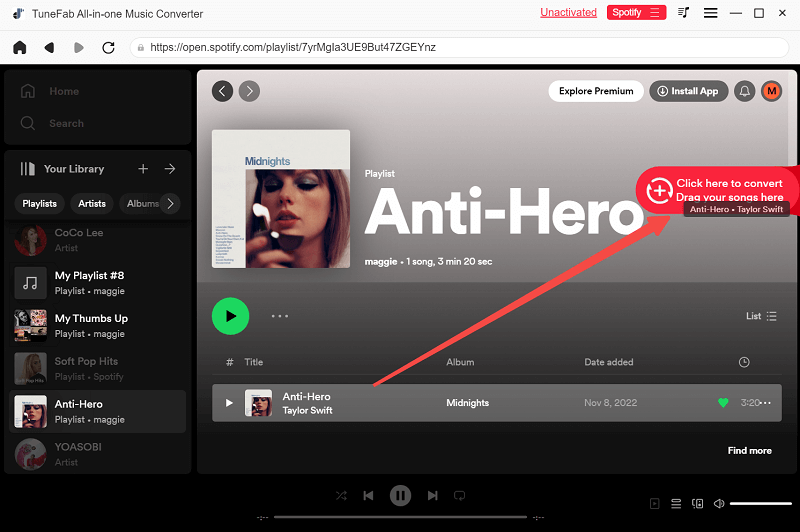
STEP 4. Now, you can directly search for the songs you want to convert. Drag and drop them to the red floating "+" icon on the right to add them to the conversion list.
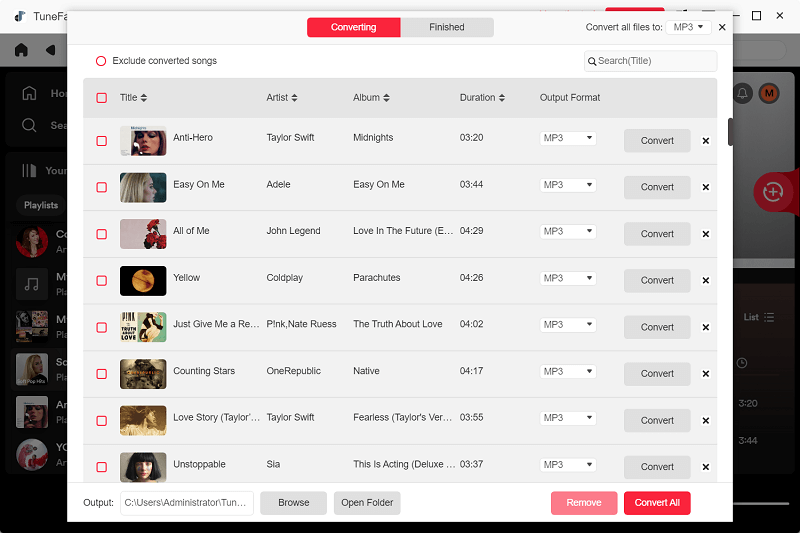
STEP 5. Click the arrow next to "Convert all files to" at the top right of the pop-up window, select "MP3", and then click "Convert All" to start the conversion process. Once completed, you can view the exported files under the "Finished" tab.
FAQs About Converting WAV to MP3 on Mac
How much audio quality is lost during the conversion process?
MP3 is a lossy compression format that discards some audio data. However, if you choose a high bitrate (like 320 kbps), the loss in audio quality is minimal, and most people find it difficult to perceive significant differences. The extent of audio quality loss depends on the bitrate selected and the quality of the original WAV file.
Will the converted MP3 files retain the metadata of the original files?
Not all software or tools retain ID3 tags during file conversion. While free or online tools may not offer this feature, professional music conversion software, such as TuneFab All-in-One Music Converter, can preserve all the metadata of the original files after conversion, including artist, album, and title information, allowing for better file management.
You May Also Like:
How to Convert M4A to MP3 on Windows/Mac
4 Best Ways to Convert FLAC to MP3 for Free
Conclusion
Since MP3 is compatible with nearly all audio players and devices while taking up less space, more and more people are willing to convert WAV to MP3. The process of converting is not complex, and in this article, we have come up with 3 effective methods, each with its unique advantages and use cases. By following these steps, you can get the task done easily. In addition to the 3 ways for converting WAV to MP3, we've also introduced a professional tool, TuneFab All-in-One Music Converter, which allows you to easily download your favourite music to MP3 with original quality and ID3 tags. Give it a try if you're in need!