You may want to cancel your Apple Music subscription for reasons such as switching to another music streaming platform or saving on monthly costs. However, since Apple Music content is deeply tied to your account, canceling your subscription typically means losing all your saved songs and playlists, even if you've downloaded them.
You're in the right place. This blog will show you how to cancel your Apple Music subscription on multiple devices, and even preserve your music library at the same time via a desktop software, TuneFab Apple Music Converter. Keep reading and get started!
100% Secure
100% Secure
You May Like:
- Part 1. How to Stop Apple Music on iPhone/iPad/Apple Vision Pro
- Part 2. How to Delete Apple Music Subscription on Android
- Part 3. How to Cancel Apple Music Subscription on Windows PC
- Part 4. How to Cancel Apple Music Subscription on MacBook/iMac
- Part 5. How to Remove My Apple Music Without Losing Songs 🔥
- Part 6. FAQs About Cancelling Your Apple Music Subscription
Part 1. How to Stop Apple Music on iPhone/iPad/Apple Vision Pro
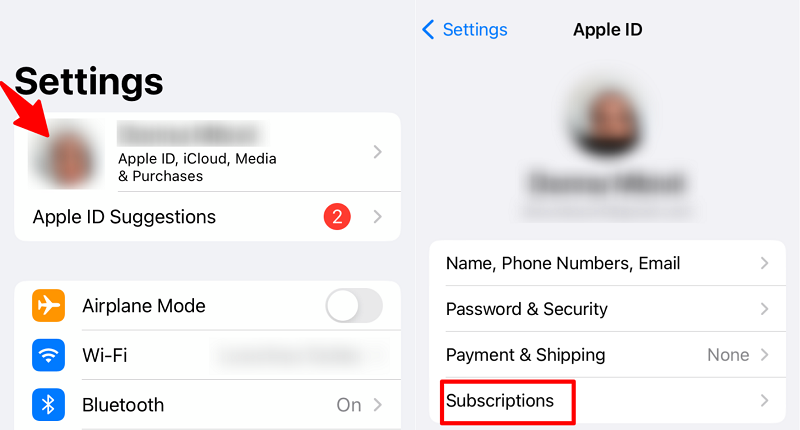
With the consistency of the Apple ecosystem, you can cancel your Apple Music subscription on iOS devices such as iPhone, iPad, and Apple Vision Pro through the built-in settings. Here are the steps.
Step 1. Launch the "Settings" app on the device.
Step 2. Tap your name, tap "Subscriptions", and reconfirm "Apple Music".
Step 3. Scroll down to the "Cancel Subscription" button and tap to cancel your subscription. Then, an expiration message in red text will pop up to confirm that you've canceled the subscription successfully.
Part 2. How to Delete Apple Music Subscription on Android
The Apple Music app is available on Google Play, so you might have subscribed to it on your Android device. Here are instructions on how to cancel your Apple Music subscription on Android.
Step 1. Launch the Apple Music app on your device.
Step 2. Tap the menu button, then tap "Account" to go to "Manage Subscription".
Step 3. On the new screen, select "Cancel Subscription" and follow the onscreen instructions to finish the process.

Part 3. How to Cancel Apple Music Subscription on Windows PC
Now that we've learned how to cancel an Apple Music subscription on mobile devices (iOS & Android), it's time to dive deep into the answer to how to cancel an Apple Music subscription on a computer. Here we'll start with the method to cancel your subscription to Apple Music on a Windows PC.
Cancel via the Apple Music App or Apple TV App
If you've downloaded Apple Music or Apple TV on your Windows computer, the steps below are for your information.
Step 1. Open the Apple Music app or Apple TV app on your Windows PC.
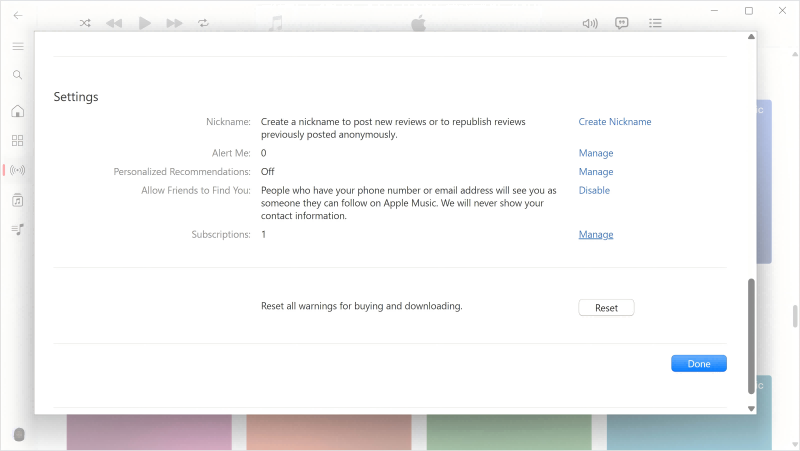
Step 2. Click your name at the bottom of the sidebar, then choose "View My Account". You might be required to confirm your identity by signing in to your Apple Account.
Step 3. Scroll to the "Settings" section, locate "Subscriptions", and click "Manage" next to it to find the subscription that you want to cancel.
Step 4. Click "Edit" of the selected subscription, select "Cancel Subscription", and click "Done" to confirm your cancellation.
Cancel via An Older Version of iTunes
You can only download the standalone Apple Music app or Apple TV app in Windows 10 and later. Therefore, for a Windows computer running with previous versions like Windows 8 or Windows 7, you need guides to walk you through the cancellation via iTunes. Below are the details for your reference.
Note: You can use iTunes to export files or your entire library as an XML file, thereby backing up your Apple Music library in case you lose your music after canceling your subscription.
Step 1. Open iTunes on your Windows PC.
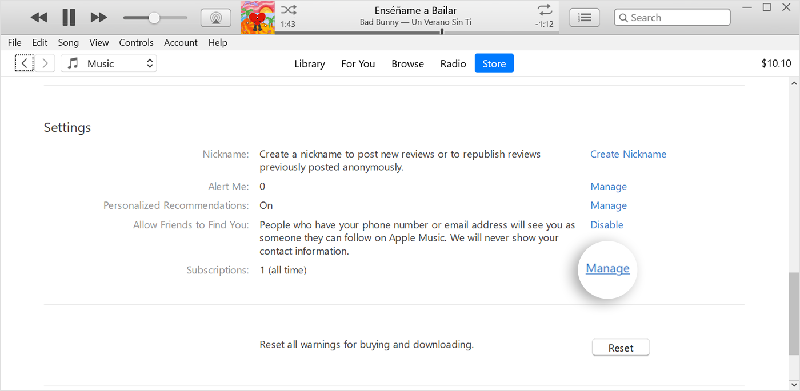
Step 2. Choose "Account" from the menu bar, select "View My Account", and scroll to "Settings" to find "Subscriptions".
Step 3. Click "Manage" (next to "Subscription") to find the subscription that you want to cancel, then click "Edit", and click "Cancel Subscription" to confirm it.
Part 4. How to Cancel Apple Music Subscription on MacBook/iMac
As the Settings app has been integrated with your MacBook/iMac, the process is easy to catch. Below you can find detailed instructions for how to cancel an Apple Music subscription on Mac/iMac.
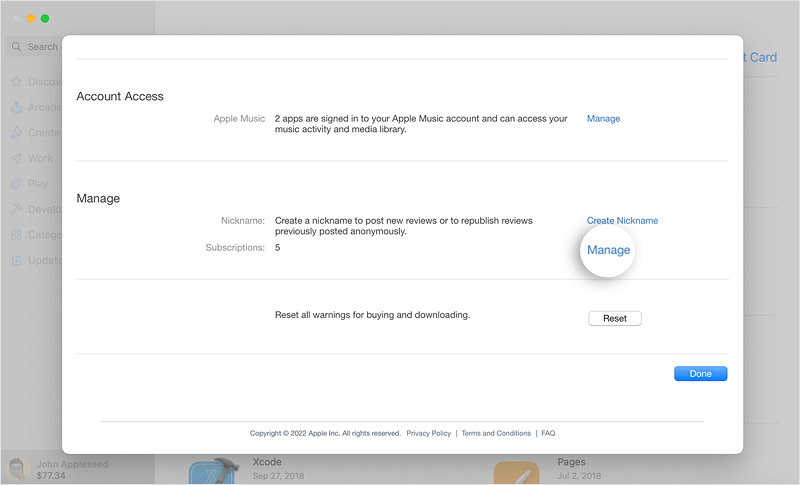
Step 1. Open the "App Store" app, click your name, and select "Account Settings". If you can't find your name, click "Sign In" to confirm your identity.
Step 2. Scroll to "Subscriptions", and click "Manage" to find the subscription you want to cancel.
Step 3. Click "Cancel Subscription" to confirm your request. If there is no "Cancel" button or you see an expiration message in red text, it means you've already canceled the subscription.
Part 5. How to Remove My Apple Music Without Losing Songs
Once you confirm the cancellation of your Apple Music subscription, Apple will permanently delete all saved music and curated playlists once the subscription expires. This can be a significant loss if you've spent time building your library. To avoid this, you'll need to seek ways to back up your Apple Music library before you stop subscribing to Apple Music.
All you need is a powerful tool: TuneFab Apple Music Converter. It is a professional Apple Music downloader that streamlines your experience of streaming, converting, and backing up Apple Music. It can convert Apple Music to MP3 and other plain formats like M4A, WAV, FLAC, and more. Besides, it supports downloading the Apple Music library at once with a 35X or even faster speed. You don't need to wait too long for the backup.
Key Features of TuneFab Apple Music Converter:
● Integrated with Apple Music web player for easier streaming, searching, and downloading experience
● Fully compatible with Windows & Mac to back up content on Apple Music seamlessly
● Save Apple Music songs, albums, and playlists to DRM-free audio files at up to 35X speed
● Preserve the original sound quality with Bitrate up to 320 Kbps and Sample Rate up to 48 kHz
● Retain all original ID3 tags and metadata information to ensure your music library remains organized on other devices
Let's see how efficiently you can get local audio files from Apple Music with TuneFab Apple Music Converter.
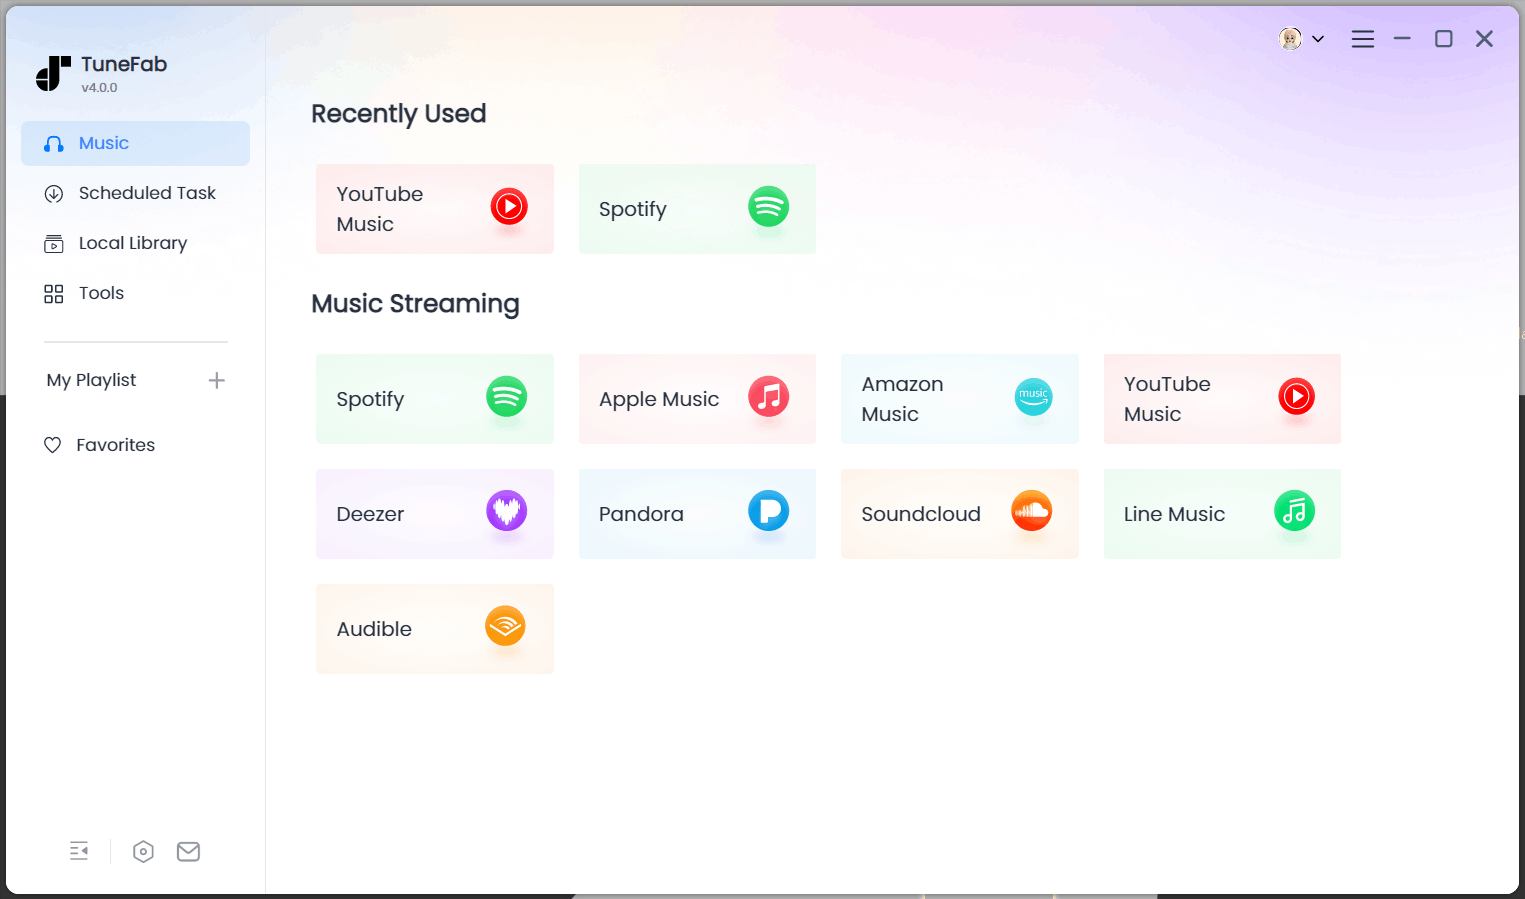
Step 1. Get TuneFab Ready on Your Computer
Download and install the software on your computer. Then, launch it, select Apple Music to proceed with, and log in with your Apple Music account (subscription required).
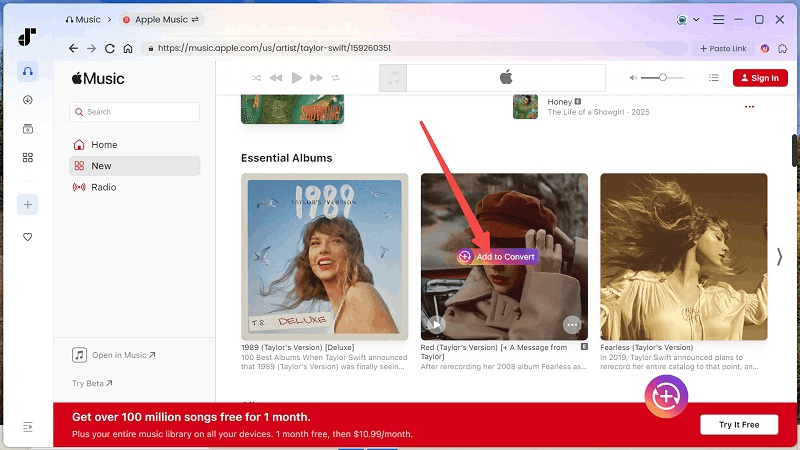
Step 2. Search and Add Apple Music
Input the keywords in the search bar, and results including single songs, albums, or playlists will be shown. Select the one you want to download and drop and drag to the conversion list sticking on the right side. Here you can also click the red "Add to the conversion list" button.
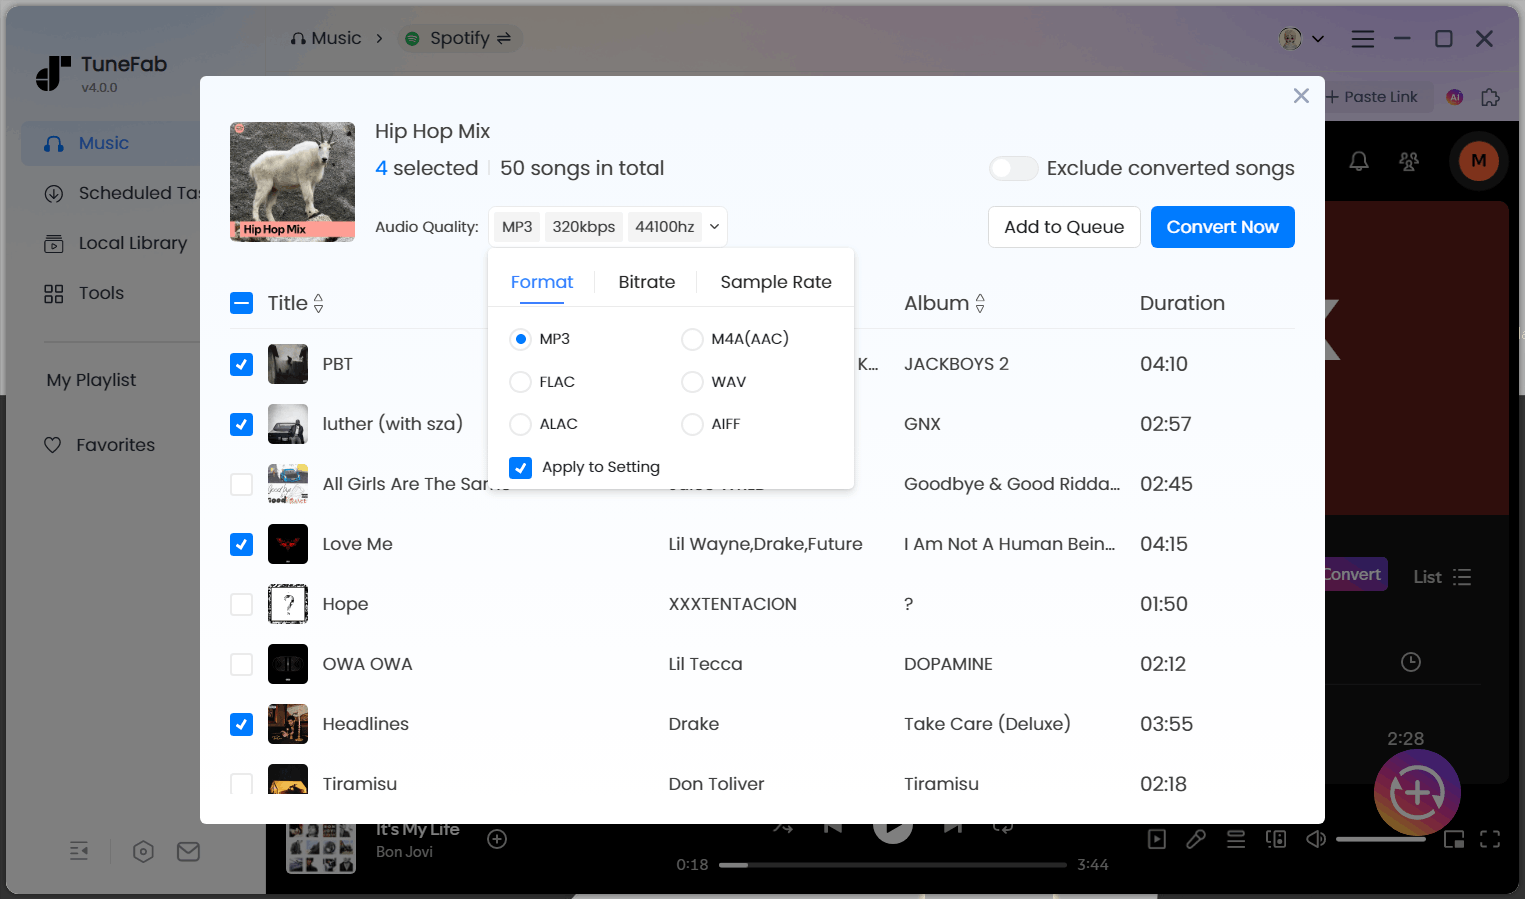
Step 3. Customize Output Parameters
In the converting window, you can set the format, sample rate, and bitrate for each song, or apply your settings to all selected tracks. For more settings like the location and file names, go to the "Settings" menu and find the "Preferences" tab.
Step 4. Download Apple Music to Local Files
After confirming all settings, click the "Convert All" button to download your Apple Music library at once. You can find all the downloads in the "Finished" tab and check out where it is stored on your computer by clicking the file folder icon next to each title.
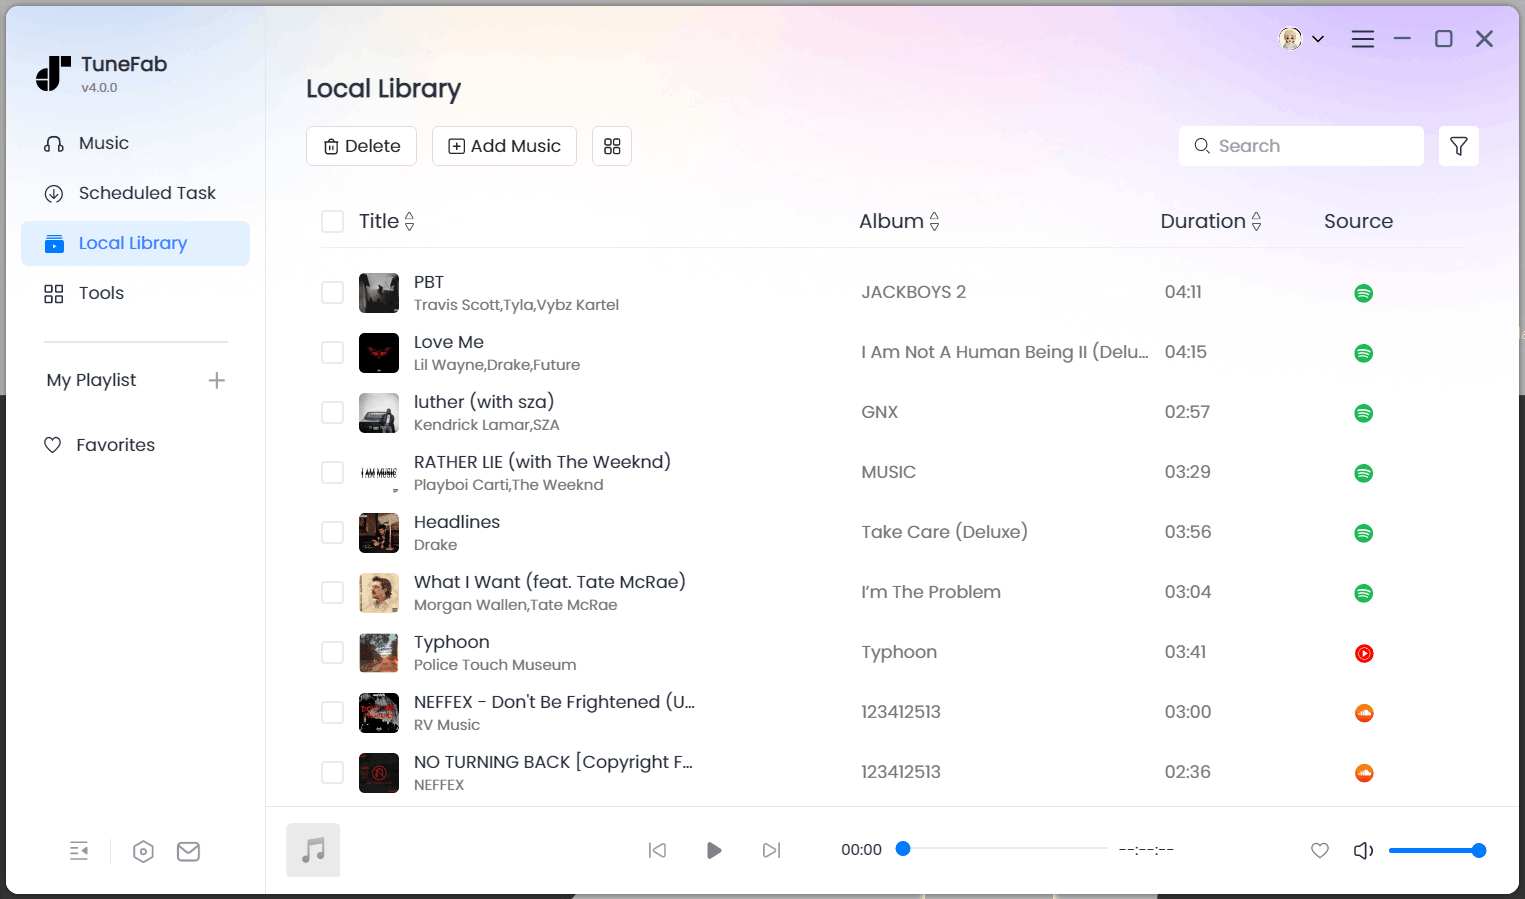
Since all Apple Music downloads are plain audio files, you can transfer them to any device for backup or offline playback, without worrying about losing them after stopping Apple Music service!
Part 6. FAQs About Cancelling Your Apple Music Subscription
Q1: How to Cancel Auto Payment for Apple Music Plan?
When a valid payment method is provided, Apple will auto-renew your Music subscription without asking for your confirmation each time. If you do not want to be charged for the auto-payment, follow the steps below to make sure you've stopped the auto-renewal service:
Step 1. Open the "Settings" app, tap your name, and select "iTunes & App Store".
Step 2. Tap "Apple ID: [your email]" at the top, then tap "View Apple ID" in the pop-up window. You may be asked to enter the password.
Step 3. Tap "Manage" under "Subscriptions", find "Apple Music Membership", tap it, and toggle the auto-renewal option to off.
Q2: Can You Stop Apple Music Immediately and Get Refunds?
If you purchase by mistake or happen to select an unwanted plan, you can contact Apple Official Support and explain you need to end the service immediately and get a refund as soon as possible. However, you will be charged for the service until the next billing date in most cases.
Summary
This blog provides step-by-step instructions on how to cancel Apple Music subscription on various devices. Regardless of your device, if you want to keep your saved content, TuneFab Apple Music Converter is a must-try. Compatible with both Windows and macOS, this software lets you batch backup your content while preserving the original audio quality. Enjoy your library for unlimited playback without quality loss. Be sure to try it before canceling your Apple Music subscription!

TuneFab Apple Music Converter
One click to remove DRM from Apple Music without quality loss.


